Friday, May 28, 2010

Whoooo ....birth announcement

My baby sister's best friend {since before kindergarten} and her husband just welcomed their first baby into the world on Wednesday. A sweet little boy...I decided I wanted to make something for them as a keepsake...his nursery is decorated in owls, so this should fit in perfectly.


To make this sweet lil project I used:
a 7" x 7" board {cut by my local Lowe's}
regular ol'wire
scrapbook paper
mod podge
emery board
bulldog clip
E6000
cricut machine
jute rope
ink pad/acrylic paint

After getting my board cut, I traced the paper to fit the front of it, mod podged the sweet lil owl paper on and let it dry. Then I drilled two holes at the top and added my wire. I like the look of rough edges so I used an emery board and filed all around the paper. Then I painted the edges of the board. Next I used my cricut to cut out his lil name and adhered it with more modpodge; then I printed out his stats and modpodged them on. Using E6000 I attached the bulldog clip and add a little jute bow. Finally I took my black ink pad to add just a little more distressing...I love how it turned out and can't wait to see lil Grant's picture in it... {the pic is of my son...}


linking up to these blog parties:

Tuesday, May 25, 2010

Time For Some Rules...

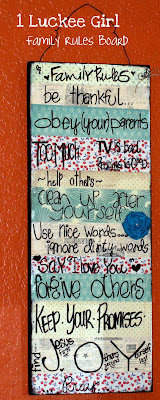
Ok...so I know that you have probably all seen these sweet "family rules" canvas projects. They are all over blogland, but I have not had the time until just this past weekend to work on one for myself. So... I decided that I didn't really want mine on canvas, but that I would try mine on some boards that I had (read my hubby) already cut. I was first inspired by this post, and then by this post, so then I started playing around .... and here is my finished "family rules" board...I am really pleased with how it turned out :)


1. One board...mine is (roughly) a 12 x24
2. Fun patterned paper. (I cut mine in different sized strips)
3. mod podge :)
4. I used a paint pen and eyeball some fun fonts to write my rules...
5. I then added a fun lil fabric rosette
6. Drilled two holes at the top and added some regular ol' wire...tada!!!


Linking to these parties....

Saturday, May 15, 2010

Sassy Lil Treat Jar


I decided to make this sassy lil treat jar just because I like things that can be used in my classroom, but don't necessarily look like they came from a "teacher store" :)


Things You Will Need to Make Your Own Teacher Treat Jar:

1. A clear plastic jar (mine is from Wal-Mart ($1.68 I think) and is Rubbermaid)
2. Pattern Paper
3. Mod Podge
4. Hot Glue Gun
5. Ribbon
6. BLING (not an option for me ;)
7. Chipboard or mdf crown or (other shape of your choice)
8. And for the cute lid topper check out eighteen25's free download...(There are other sayings...one for mom's stash and a bubblegum bribe)


I measured the sticky label in the center of the container, but I DID NOT attempt to pull it off...I simply covered it with mod podge and patterned paper. Then I added the strip of zebra paper (more mod podge). Next, came the ribbon that I hot glued around the edge of the paper covering the label. Finally I covered a crown mdf shape I had in my stash with paper and printed my saying, adhered it w/ yep! Mod Podge and then hot glued the crown to the jar...then I blinged that baby out! Added the gingham bow, and then mod podged (Yes! I just turned that into a verb) the topper on to a black scalloped circle I cut out with my cricut.

Now to fill it up with some yummy chocolate!


SYS Teachers


New Style Paver=Easier Painting!!!

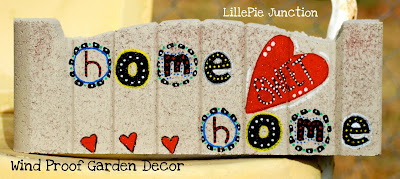
I found this paver stone without grooves...thought painting it might be a little easier. It was!!! These are so much fun! I am GOING to make myself one soon... This is the same paver; both sides are painted to make it a reversible decor item :)


This is for a friend's daughter to give to her 3rd grade teacher who is retiring this year...She plans on doing lots o' garden and flower planting during her retirement...this should be a sweet touch of whimsy to add to her flower bed...


Woot Woot!

Red Letter Week!!!!

I was featured for the first and second and third time this week with my painted garden pavers!!! Man, that makes me want to stay up 24/7 and craft it up!!! I love seeing all the great ideas out there, and it never fails that my silly crafting "adhd" kicks in when I visit one of the bajillion blogs I follow...is it possible to be addicted to blog digging???

One more week of school....then I can focus (yeah right) on M-A-J-O-R projects that I want to get completed...

List

1. Swap out my craft room with Chloe's bedroom...she will finally get a BIGGER closet and more room for all the things she likes to create... PAINTING IS IN MY FUTURE>>>she really wants a purple bedroom...which makes me remember my own childhood bedroom.

2. Paint my bedroom...and secretly re-paint my bathroom (eeks...just painted it over Christmas break, but changed my mind on the color scheme I want to go with...)

3. Try my hand at this adorable bed skirt idea from Shanty2Chic...

4. I am going to make one of these adorable planters for my from door area from Positively Splendid...so stinkin' cute

5. Add much more after a shower, some sleep, and COFFEE!!!

xoxo,

LaKeta


Saturday, May 8, 2010

Wind Proof Garden Decor...


These lil' cuties are going to my momma and my hubby's mom for Mother's Day!


I wanted to make a cute whimsical garden decoration and found these adorable shaped pavers at my local Wally*World. They were originally a reddish color, but I wanted a more neutral palette so decided to spray paint them with a satin finish "pebble" color.

After spraying the red away, I used patio paint pens and my acrylic paints and created the cute little sayings for each momma....Then decided to go a little further and personalize each one. So now they can turn them around for a different look whenever they want! I think they will look precious in their flower beds or on their front porches...Next up will be one for myself with my house number...and maybe a favorite scripture...

Linking up to:

Join us Saturdays at tatertotsandjello.com for the weekend wrap up party!
UndertheTableandDreaming
Making

giveaways

PonyTails and FishScales


http://somedaycrafts.blogspot.com/

Photobucket

Swidget 1.0

LinkWithin

Related Posts with Thumbnails